Search This Blog

Saturday, April 27, 2013

World Bacon Championship, Part 2 of 4

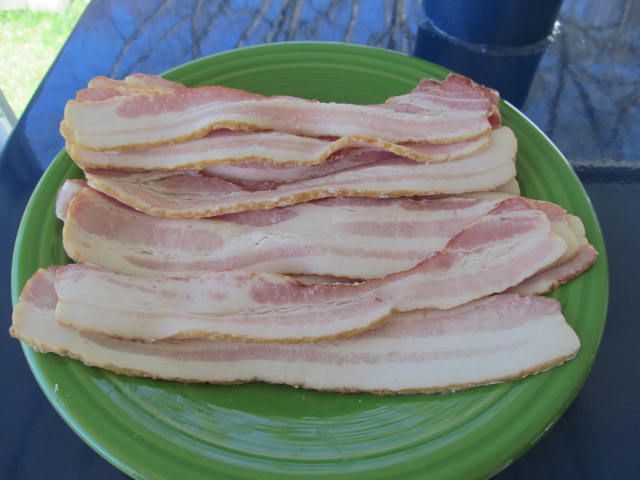
Today's World Bacon Championship category is: Anything wrapped in bacon.  Now, I imagine that there will be a decent amount of Fatties and sausages wrapped in bacon that are turned in that day.  For those who don't know, a Fatties is ground sausage, rolled out thin, filled with a stuffing of your choice, rolled up, and encased with a bacon weave.  Here is one that I made.  A good choice for this competition, but I want to be different.  So, in order to get a little beef into our judges diet, I am going down the flank steak path.

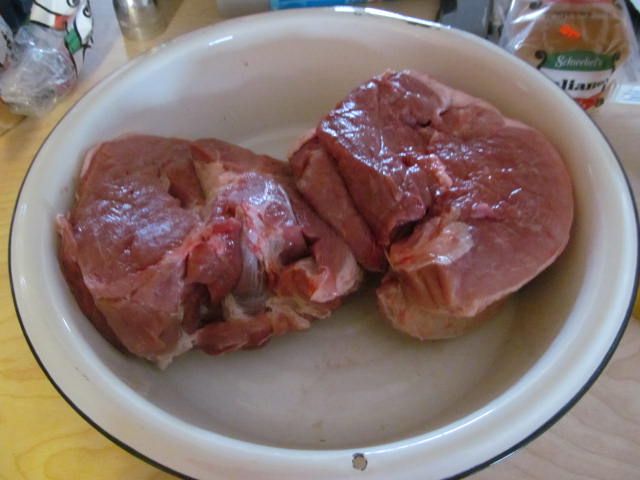
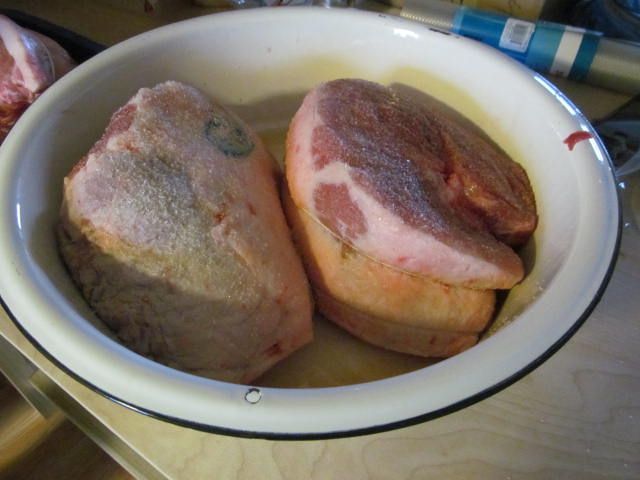
So, I took two flank steaks, pounded them out and tenderized.  Then, I marinaded overnight in Stubbs Beef Marinade...


Then, I prepared two types of filling.  One was caramelized onion, Gorgonzola cheese, and sriracha sauce.  One was caramelized onion and garlic herb cheese...


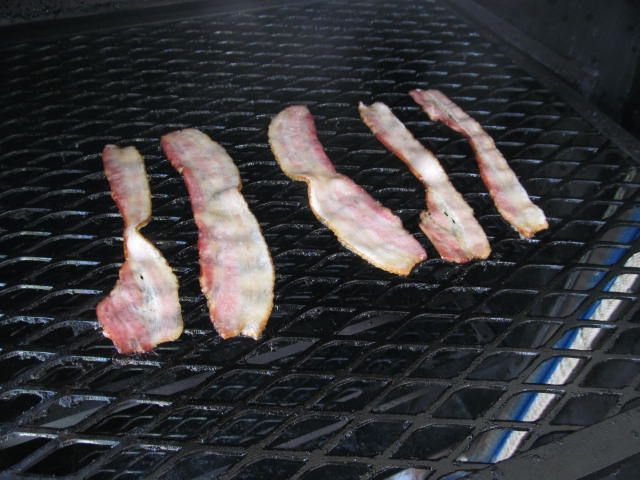
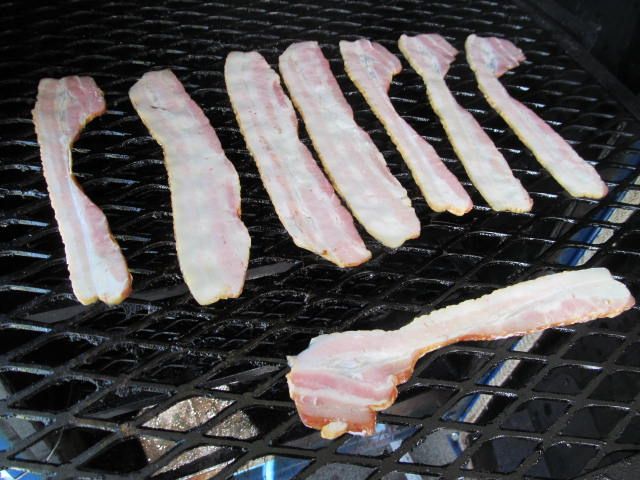
Then, I removed the steaks from the marinade, laid flat, and spread the cheesy filling out on the beef.  Then I rolled up, closed with toothpicks, and wrapped with bacon.  Then, on to the smoker at 375 F...


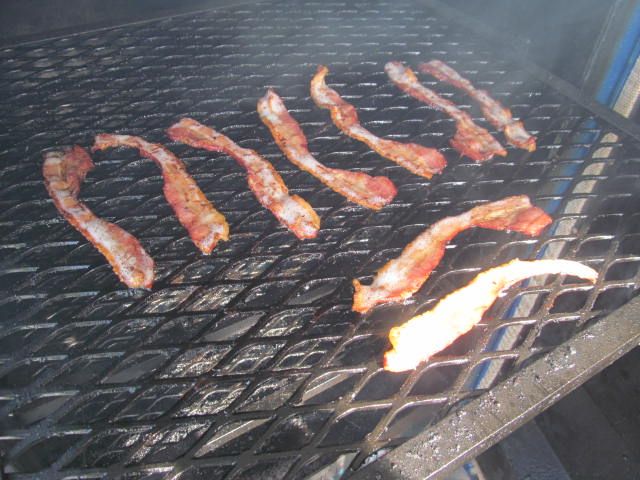
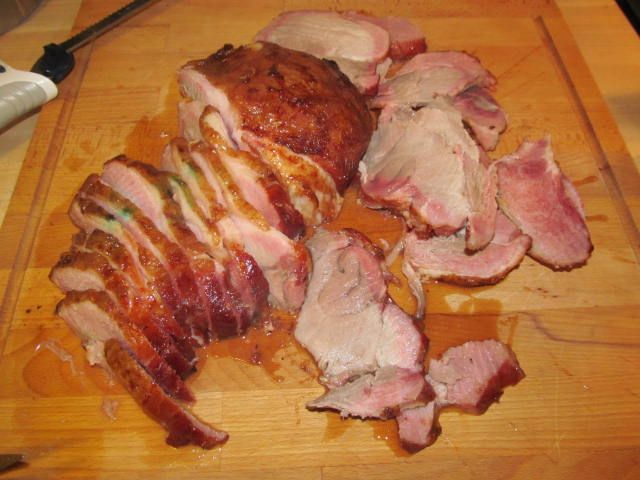
 Pulled when done, about 30 minutes.  Then let rest, then sliced...


They were both very good.  I liked the creaminess of the Gorgonzola with the added sriracha kick.  Hope liked the mellow flavors imparted by the garlic and herb cheese.  We are still debating over which one to use as our recipe.  Rest assured, I believe we will score well either way.

What will a do differently next time?  A little less filling and I will make a weave to wrap around the outside instead of single bacon slices.

Either way, outstanding!

Thanks for stopping by,

Bill

Tuesday, April 23, 2013

World Bacon Championship, Part 1 of 4

Our first competition this year is at the Roc City Rib Fest in Rochester, NY.  On Saturday, the NEBS Competition is themed this year.  This will be the home of the World Bacon Championship.  Giddy Up boys and girls.  Lots of pork going on here.  Just imagine the smell that will be coming from Rochester when around 100 teams are cooking bacon at the same time.  Mmmmm...

Anyway, there are four categories:

1.  Plain Bacon in a Box.  No rub, no sauce, no seasoning.  Just your bacon, cooked, in a box.  A mano a mano bacon throw down of porkilicious proportions.  It boggles the mind.  Doesn't it?

2.  Wrapped in Bacon.  Anything you want, wrapped in bacon.

3.  Savory Bacon Dish.

4.  Bacon Dessert.

Today, we will focus on category one, Plain Bacon...

I bought 2 pounds of uncooked heaven from our butcher, Dave's Country Meats this weekend for this R&D session of porktastic proportions...


Dave's bacon is the best in our opinion: not too salty, not too sweet, and just the right amount of smoke.     It is the perfect canvas for our turn in box.

I fired up the smoker and brought it to a temperature of 375 F.  Then, I added a few slices and cooked for 10 minutes, then flipped and cooked 10 more minutes.  These slices came out the way that I like them: crispy.


Then it was time to experiment and taste as I went along.  It is a tough job, but someone has to do it... ;)


A couple of slices here...


A couple of slices there...


A taste from every batch...


Just flipped...


Cooked to perfection, just before pulling...


Samples anyone?

What is the verdict?  At 375 F, the best bacon was that which had 16 minutes of total cooking time with a flip halfway through.  Flexible, but not limp.  Some crisp, some chew.  Bacon in this style had more taste than the totally crisp rashers.

Stay tuned for part two: Something Wrapped in Bacon...

Thanks for stopping by...

Bill

Sunday, April 21, 2013

Slappin my Chicken: Slap Yo Daddy Chicken Rub Review and Chicken Practice

A couple of weeks ago we did a practice chicken cook to try and perfect our recipe for 2013.  At the same time we tried a new rub:  Harry Soo's Slap Yo Daddy Chicken Rub...


After opening the package, we performed the obligatory sniff and finger test.  The chili, onion, garlic, and cumin flavors where obvious upon nasal spectroscopy.  The finger test added a taste of citrus that brought it all together.  This was a rub I could fall in love with.  But, the biggest test was up next: competition style chicken...

We are trying to get away from thighs.  I love a good chicken thigh, smoked to perfection with a blend of rub and sauce.  What I do not like is trimming a scraping a thigh to get bite through skin.  So, we have been experimenting with legs and thighs this off season.  First, I started with some whole chicken legs...


Using poultry shears, I separated the leg from the thigh, removed the knuckles from the thigh bone, and marinaded overnight in Italian dressing.  In the morning, I removed from the marinade, patted dry and placed into foil pans.  Then, I seasoned both sides with a coating of Slap Yo' Daddy Chicken rub...


Once the rub became "wet", I applied a second coat on the top...


The chicken then hung out in the refrigerator all day until hitting the smoker.  The cooking process is as follows:

30 minutes on the rack, 275 F, skin up.
Dunk in sauce, placed into a foil pan, skin side down, 30 minutes at 275 F.
Remove from pan and place on rack, skin side up.  Applied sauce at start, then after 15 minutes.  Ramped temperature up to 300 F.  Pulled after 30 minutes.  So, that is a total cook time of 1.5 hours for those keeping score.  Here is how they looked:


I have to say, I love the SYD chicken rub.  I nice mix of spices with a bit of heat.  Actually, if you go a little heavy handed, it is a lot of kick.  But, after a night in the frig, the heat did mellow out a bit.  So, if you are adverse to spice, watch how much you put on your yardbird.  I will be backing off the rub a bit for competition.

As for the chicken, I am liking the tender and moist meat that the higher cook temperature is creating.  The skin on half of the thighs was bite through and the skin on all of the legs was bite through.  I believe that for our first competition this year, we will be turning in legs that are separated from the thighs on a whole leg.

Overall, the Slap Yo' Daddy Chicken rub will be part of our first competition.  The blend of spices and citrus flavor is perfect with the dressing marinade and sauce.  Rating?  3.5 out of 4 stars.  I can't wait to try this rub on some other cuts of meat...

Thanks for stopping by...

Bill

Friday, April 19, 2013

Heaven in a Basket

A few weeks ago, I had an hour to kill before I had to pick up the youngest.  So, I decided to do so at one of my favorite places for lunch in Cranberry Township, PA:  I went to the Brighton Hot Dog Shoppe.

The Brighton Hot Dog Shoppe is exactly what you would expect: dirty water dog heaven.  The dogs are boiled to perfection and served on spongy, steamed hot dog buns.  You can get them any way you like: with yellow mustard, relish, ketchup, chili, cheese, onion, etc...  They also have fries, onion rings, and sinfully think shakes made the old fashioned way with real whole milk and ice cream.  If you are looking the eat healthy, this is not the place for you.  Just keep on going to the nearest salad bar.

What do I order?  I get two dogs with chili, cheese, and onion, plus fries with chili and cheese.  Pure artery clogging sin.  But, once or twice a year, this hits the spot...


The Brighton Hot Dog Shoppe has counter service and full service sit down.  Everyone is friendly and the service is great.  They also have diner style breakfast in the morning as well.  So, if you are in the Cranberry area and love a good hot dog, this is the place to go.

Bottom line, 3.5 stars out of 4.

Thanks for stopping by...

Bill

Saturday, April 13, 2013

Finally, Grilling Time!

It has been a cold and wet March around here.  Blowing and snowing.  March really didn't go out like a lamb.  It really dug its claws in and hung around.  But, last weekend, it was finally nice enough to do some grilling in shorts!

When I was at the butcher, he had some nice flank steaks in the case and the grocery store had some good looking fresh asparagus.  Some hardcore grilling was in order.

After looking around the pantry, I had 3 or 4 bottles of Stubbs Beef Marinade.  I was not impressed using this stuff on brisket.  It just added flavors I did not care for in my brisket.  But, I figured "why not" and used one of the bottles as a marinade on this flank steak.  I was pleasantly surprised...

Here is the subject in focus, a beautiful flank steak, right out of the wrapper...


I also got to use my new toy, a meat tenderizer that I found in our BBQ trailer.

First, I tenderized both sides of the meat thoroughly...


Then, into a plastic bag with the Stubbs marinade for a two hour swim...


Then, I mixed up some marinade for our asparagus: olive oil, sea salt, minced garlic, and fresh ground lemon pepper blend...


How much of what you ask?  Just enough olive oil to slurry the dry ingredients, a tablespoon of the garlic and salt and pepper to taste.  Nothing fancy.  Then, into the bag for a swim.

I fired up the grill and got it screaming hot.  While the grill was heating up and after two hour of marinade at room temperature, I pulled the flank steak from the bag and let it drip drain.  Then, I coated both sides with a nice beef rub: Oakridge BBQ Santa Maria Steak Rub...


After allowing the rub to form a moist outer coating, about 30 minutes, onto the hot portion of the grill with the asparagus.

Obviously, flank steak is thin.  So, you don't need long to cook on a hot grill.  This piece of meat was on the grill for five minutes a side.  The asparagus was on indirect heat getting turned every minute or so.  The finished product?


Perfect medium on the inside.  Flavorful and juicy.  The Santa Maria rub complemented the citrus, chili, soy, and spice elements of the Stubbs marinade.  Served with the asparagus and crusty bread, it was a tasty night...


If you are craving beef flavor and can't have all that fat and/or don't want to pay premium prices for a better cut of beef, a properly prepared flank steak can satisfy that need for a bovine fix.

Upon further review, the Stubbs Beef Marinade works on the grill.  I would not recommend for use as a brisket injection.  That review stays at 1 out of 4 stars.  But, as a marinade for grilling a piece of beef, I will rate this marinade 3 out of 4 stars.  Is it as good as their pork and chicken marinades?  No.  But, when used for grilling, this marinade has found a place in our pantry.

Thanks for stopping by...

Bill

Wednesday, April 10, 2013

More Butt Rubbing and a Product Review: Oakridge BBQ Secret Weapon Pork and Chicken Rub

We needed to improve upon the last pork butt we practiced with.  While the taste was there, the tenderness was not.  So, more practice with a few butts this weekend...

First, we injected with a mix of hard apple cider, Worcestershire sauce, and soy sauce.  We used the Jack's Hard Cider we purchased at Hauser Estate Winery in Gettysburg...


We made 4 cups of injection and split it evenly between 2, 7.5 pound bone in pork butts.  Once injected, we wrapped with plastic wrap and placed in the refrigerator overnight...


The next morning, I got up, fired up the smoker, and pulled the pork butts out of the frig.  Then, I rubbed each butt thoroughly with the Oakridge Secret Weapon Pork and Chicken rub.  I did not cut the rub with any brown or turbinado sugar...


Note the ingredients...


After about an hour, the smoker was up to temperature, about 235 F.  I added apple, hickory, and pecan to the ash pan for smoking wood and placed the butts on the top rack, fat cap up.  When the butts hit 165 F internal, I placed them in foil pans and covered with foil.  When the foiled butts hit 195 F, I placed the pans into a cooler lined with towels and allowed them to rest.  So, for some ideas on time:

7 hours from room temp to 165 F.
2 hours from 165F to 195 F while foiled.
2 hours rest in the cooler.

After the rest, we brought the butts in to dissect.  Here is the final product...


Money muscle...


Pulled with bark...

As is always the case, one money muscle was better than the other.  One main reason we cook two butts.  The pulled pork was moist and tender with a mellow smoke flavor.  For the sauce, we mixed Blues Hog Regular with some Blues Hog Tennessee Red and some defatted pork juice from the pans.  Perfect, sweet, but not too sweet.  Spicy, but not over the top.

As for the Oakridge Secret Weapon Pork and Chicken rub, I can't say enough.  It had the right amount of spice balanced with sweet.  It complemented the sauce and injection perfectly.

Bottom line:

Did the Jack's Hard Cider add anything special?  Probably not.  But, it was a nice substitute for apple juice and I would use it without hesitation should we run out of AJ in the future.

Oakridge Secret Weapon Pork and Chicken Rub, 3.5 stars out of 4.

The pork butt was the best we have made.  Moist, tender, not too much sauce, and the right amount of smoke.  Will it will us a trophy?  Who knows.  But, it is worthy of a call for sure...

Thanks for stopping by...

Bill

Saturday, April 6, 2013

Another Practice with a Home Cured Ham and a Veggie Roast

Earlier in the year, I gave making a home cured ham a whirl.  We liked the taste, but I was a bit unsatisfied as the cure did not make it to the middle of the ham.  So, for Easter, I cured three, five pound fresh hams and took a different approach.

Before coating the outside of the ham with the sugar/salt mix, we made a small batch of brine for injecting.  It was 1/2 cup of turbinado sugar, 1/2 cup of sea salt, and 1 cup of water...


We brought it to a boil, placed in a pint canning jar, and let sit in the refrigerator all day long to cool down.  Once chilled, I injected into the deepest part of all three hams...


Then we covered with a 50/50 mix of sea salt and turbinado sugar, covered with foil, and placed in the refrigerator...


After three days, we removed from the refrigerator, drain the water that had been pulled from the pork by the sugar/salt mixture, and reapplied the sugar/salt mix...


Look at all of the water that was pulled out of the meat in just three days.  Impressive if you ask me.

Then, after eight total days of cure time, I rinsed the hams thoroughly with cold water to remove the excess salt and sugar...


Then I covered with ice to sit over night and remove more of the salt/sugar mix...


The next day, I fired up the smoker and removed the racks inside so that I could hang my hams for smoking.  While I was waiting on the smoker to come up to temperature, 200 F, I prepared my hams for smoking.  I removed them from the ice and patted them dry.  Then I prepared my ham stockings...


I purchased these ham stockings so that I could smoke hams, but I can't wait to use them to make chicken stock.  Just put your chicken and veggies in one of these and you should eliminate the hassle of straining the broth.  But, I digress...

After the hams were placed in their Easter stockings, Hope tied them to the wooden hangers.  I used untreated pine for my hangers, and had pre-seasoned them in the smoker.  Don't use treated wood as you may leach chemicals from the wood into your meat.  Bad news...  Once tied, I placed the ham into the smoker with a 50:50 mix of hickory and apple smoking wood in the ash pan...


After three hours...


I took the hams to an internal temperature of 150 F.  Then, I pulled two of the hams to chill and freeze for later in the year.  With the third ham, I ramped the temperature of the smoker up to 350 F and brought the internal temperature of the ham to 165 F for dinner.  Here are the two hams I pulled at 150 F...


For a side dish, I made a brussel sprout and asparagus roast (yes, fresh asparagus is back!)


Quick and simple...

Brussel Sprout and Asparagus Roast

1 lb fresh brussel sprouts, cleaned, trimmed, and cut in half
1 lb fresh asparagus, cleaned, trimmed, and cut into 1 inch pieces
1/4 large sweet onion, diced
1 tbsp garlic
Fresh ground pepper and sea salt to taste
Olive oil for coating
Parmesan Cheese to cover

Mix all of the ingredients in a bowl with enough olive oil to coat thoroughly.  Spread in the bottom of a 9 x 12 pan that has been sprayed with cooking oil.  Cover with fresh grated Parmesan cheese.  Place foil over top to seal and place in a 350 F oven.  Bake for 30 minutes and remove foil.  Cook 15 more minutes or until the cheese and veggies are starting to brown.

Once the ham was done, I brought it inside, let rest for 15 minutes, then sliced...


Served with the brussel sprout/asparagus roast and some homemade scalloped potatoes...


We really do like home curing the ham.  It allows us to make a ham with great smoky flavor and a lower salt content.  It is still a work on progress, but we are closer to a recipe that will make us happy.

Thanks for stopping by...

Bill